By John Valentik, MS, CSCS, NASM-PES, CES
When it comes to running or any cardio training, most people focus on pace, distance, or time. But training based on your heart rate can be far more effective. Heart rate zones help you understand how hard your body is working and ensure every workout has purpose.
While there are a few variations in this style of gauging intensity, I’m going to stick with percentage of heart rate and specifically reference Apple as many people are wearing the Apple Watch these days.
Let’s use a real-life example…me. While I’ve been in the health and fitness industry for over 15 years, higher level endurance training is still relatively new to me, and I am continuing to learn. I’m going to copy two similar distance runs with a couple very big differences. Take a look at the top two images from our Olympic Tri and the bottom two images from a training run recently.


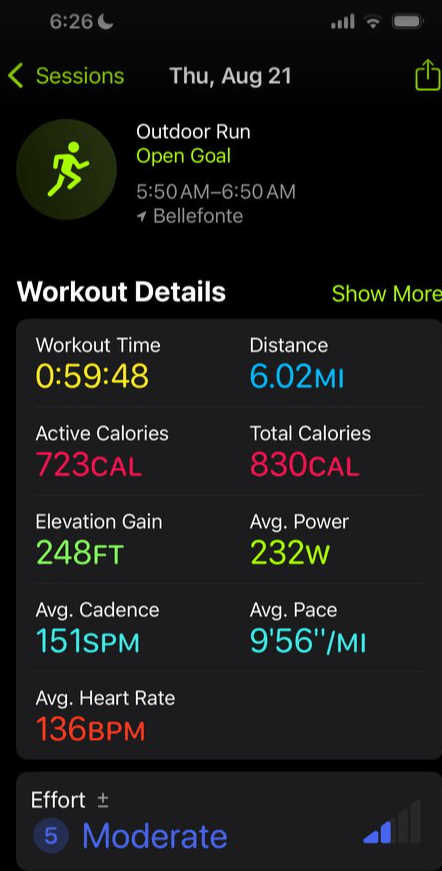

Top one is better right? Hold that thought. The top one was almost a minute pace faster but also resulted in me getting a hamstring cramp about three miles in which became very difficult to manage. The faster run was at a 160 bpm heart rate, which puts the majority of the run in Zone 4. The slower paced training run was at 136 bpm, which is primarily Zone 2.
Since my next goal involves doubling the distance of that run (plus 1.2 mile swim and 56 mile bike), I need to teach my body to have a stronger aerobic base and utilize fat even more. Essentially, I need to pace myself better so that my heart rate doesn’t have such an aggressive response to the run. For 13.1 miles, the last thing I want is cramping to begin at 3 or even 6 miles. If I can train this effectively, I should be able to eventually run faster in a lower zone.
Knowing why you’re in a specific zone makes your workouts smarter, not just harder. The goal for this next race is completion, not placing in the top three or anything like that. This means that pacing will be vital for success. Let’s take a look at these zones in more detail.
Heart Rate Zones at a Glance
| Zone | % of Max HR | Focus | Example Workout / Athlete Level |
|---|---|---|---|
| Zone 1 | 50–60% | Recovery & Warm-Up | Beginner: short easy runs, brisk walk; Advanced: recovery day |
| Zone 2 | 60–70% | Aerobic Base / Endurance | Beginner & Advanced: long easy runs, building stamina (like second example) |
| Zone 3 | 70–80% | Aerobic Threshold / Stamina | Intermediate: steady-state runs; Advanced: longer tempo efforts |
| Zone 4 | 80–90% | Anaerobic Threshold / Speed & Power | Advanced: intervals, hill repeats, tempo sprints |
| Zone 5 | 90–100% | Maximum Effort / Peak Performance | Advanced: short sprints, VO₂ max intervals, at capacity |
These zones are a guideline. If you notice my race day workout, I spent time in both zone 4 and 5. This race didn’t apply to a short sprint, however, because of some fueling issues during the race, my body was beginning to respond in that manner since it was having to combat a lack of sodium in my body from sweating it out (for another blog!)
How to Apply Zones to Your Goals
- Beginners: Spend most time in Zones 1 and 2 to safely build endurance, adapt to running, and minimize injury risk.
- Intermediate to Advanced Athletes: Add Zones 3 and 4 strategically to increase stamina, speed, and aerobic power. Tempo runs or interval workouts target these zones effectively.
- Elite / High Intensity: Zone 5 comes into play during short sprints or VO₂ max intervals. Controlled exposure improves performance while avoiding overtraining.
Why It Matters
Heart rate zone training shifts the focus from “how fast” to “how effective.” By understanding why you’re in a zone, each workout has purpose: building endurance, stamina, or speed in a controlled, measurable way.
So next time you have a cardio workout, check your heart rate, find your zone, and move with intention. Whether you’re just starting or chasing your next personal best, your heart knows the way.

Leave a comment